
Trying to figure out how to install WordPress? There are a few different methods you can use, each of which we’ll give an in-depth guide for.
First of all, why are there different methods for installing WordPress in the first place? The answer is simple… Because of WordPress’ popularity, there are a number of helper tools that make it easier to install the platform on different servers and hosts. As a result, there’s not simply one choice for how to install WordPress but multiple alternative ones.
In this post, I’ll give you a tutorial for each of the common methods for installing WordPress. To give you some guidance for which method you should choose, I’ve ordered the guides from easiest to most time consuming. So if you’re just looking for the quickest and easiest way to install WordPress, start at the top!
- Method #1: Choose a host that comes with WordPress pre-installed
- Method #2: How to install WordPress via cPanel and autoinstallers
- Method #3: How to install WordPress manually via FTP
- Method #4: How to install WordPress on your own computer
- Wrapping things up
If you are looking for a summary on How to install WordPress manually, here it is:
- Download the latest version of WordPress from wordpress.org
- Unzip the file and upload it to the
public_html(or similar) directory - Create MySQL Database and User
- Configure the
wp-config.phpfile. - Run the WordPress install
For more details, read below:
Method #1: Choose a host that comes with WordPress pre-installed
The easiest way to install WordPress is to just pick a host that does it for you. Nowadays, many WordPress-specific hosts will let you choose to have WordPress pre-installed. That means once you sign up for hosting, you can jump straight into your WordPress site. The whole question of “how to install WordPress” is irrelevant in such a case!
Here are a few recommended hosts that will pre-install WordPress for you:
- InterWeb SA – when you order hosting from us, there is an additional notes section before checkout. Write the word WordPress and we will pre-install it for you. (You can also email support@interwebsa.com and they will have it done ASAP)
- Softaculous and InterWeb SA – has tons of WordPress-specific features that make your life easier. Including the Softaculous software installed, making installing wordpress a one-click process. Hosting at InterWeb SA starts at R19.00/pm
Don’t worry if you already picked a different host, though. Most other hosts still make it super easy to install WordPress. But you will need to click at least a few buttons. More on that in the next section:
Method #2: How to install WordPress via cPanel and autoinstallers
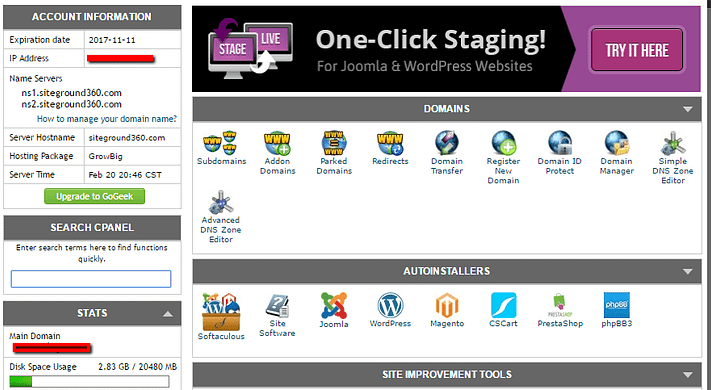
cPanel is the dashboard that most web hosts give their customers. When you sign up for hosting, your host should provide you with login details for cPanel. And for most hosts, the cPanel interface looks something like this:
In your cPanel interface, your host should give you something called an autoinstaller. Autoinstallers basically automate the full WordPress install process that I’ll outline in the next section. So instead of needing to do everything manually, you just input some basic information, click a button, and the autoinstaller installs WordPress for you.
There are a few different autoinstallers you might encounter:
- Softaculous (Offered by InterWeb SA – Find Out to Move your Joomla or WordPress Website to us)
- Fantastico
- QuickInstall
- MOJO Marketplace
And while there might be a few minor interface differences, all of the autoinstallers more or less function the same. So while I’ll show you an example using Softaculous, the exact interface for your autoinstaller might look a tiny bit different.
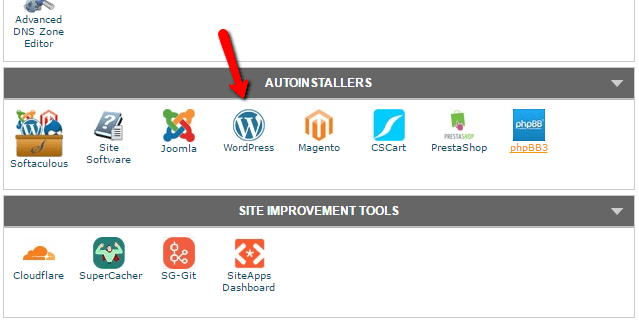
To get started, find the link to the WordPress autoinstaller in cPanel and give it a click:
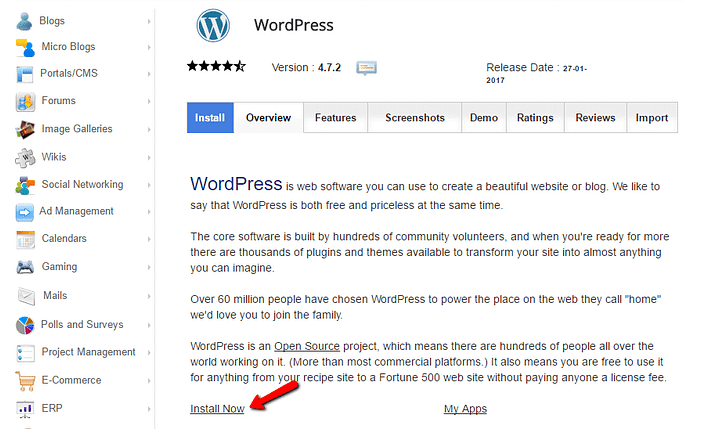
On the next screen, you should see an Install Now link (no matter which autoinstaller you’re using). Just give that another click:
Next, you’ll need to enter details for your WordPress install. Again, this interface should generally look the same no matter which autoinstaller you’re using.
First, fill in the protocol and domain name where you want to install WordPress:
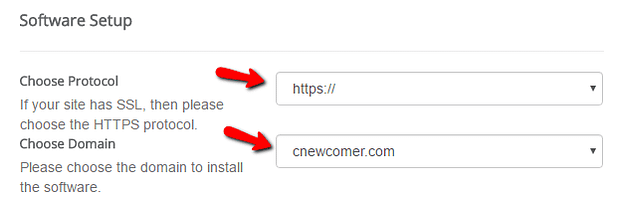
For Protocol, if you’re using an SSL certificate, you should choose HTTPS. Otherwise, you should choose HTTP. Unless you purposefully installed an SSL Certificate, the default is HTTP.
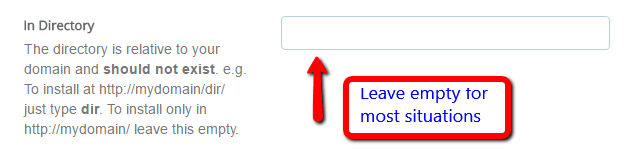
Next, choose the directory in which you want to install WordPress. For 99% of situations, you should leave this field blank. Leaving it empty means WordPress will be installed at your main domain. That is, if your domain is YOURDOMAIN.com, then WordPress will be installed at YOURDOMAIN.com rather than something like YOURDOMAIN.com/mywpsite.
A bit further down, you need to enter your Site Settings. These are just the default values for your site’s name and description. You can always change them later from the WordPress interface:
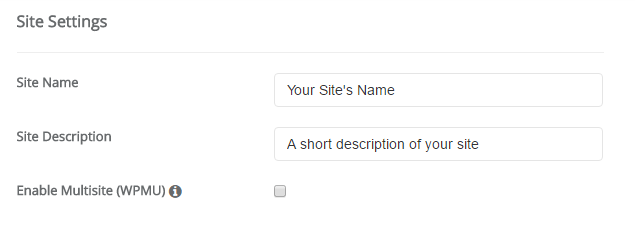
Do not enable WordPress Multisite unless you’re specifically trying to create a multisite network.
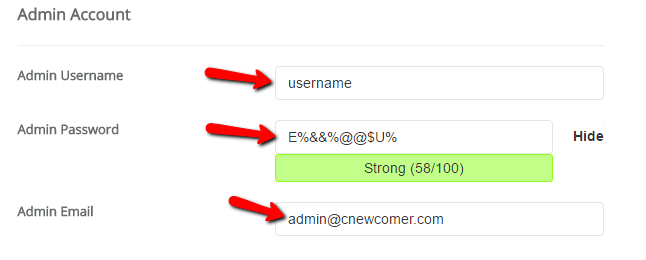
You’ll also need to create login credentials for your WordPress account. You’ll use this username/password combination to log into your WordPress dashboard after installation, so make sure that you remember it:
Depending on the specific autoinstaller that you’re using, you might see a few other options as well. You can safely ignore these. That is, it’s fine to leave anything I didn’t cover as the defaults.
Once you’ve filled out everything, make sure to click Install at the bottom of the screen. It might take a minute or so to run. Then, you should get a confirmation. You can log into your brand new WordPress install by going to YOURDOMAIN.com/wp-admin.
Method #3: How to install WordPress manually
Personally, I don’t really see a need to use this process anymore because of how simple and ubiquitous the autoinstallers above are. But if you want to learn how to install WordPress manually, keep on reading. If you’re a beginner, just use the autoinstaller process I outlined above.
To run the famous 5-minute install, you will need an FTP program to upload files. I use FileZilla, but you there are plenty of quality free FTP programs.
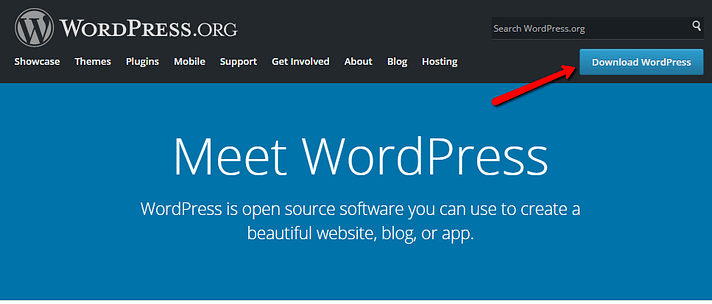
Start by downloading the latest version of WordPress from wordpress.org:
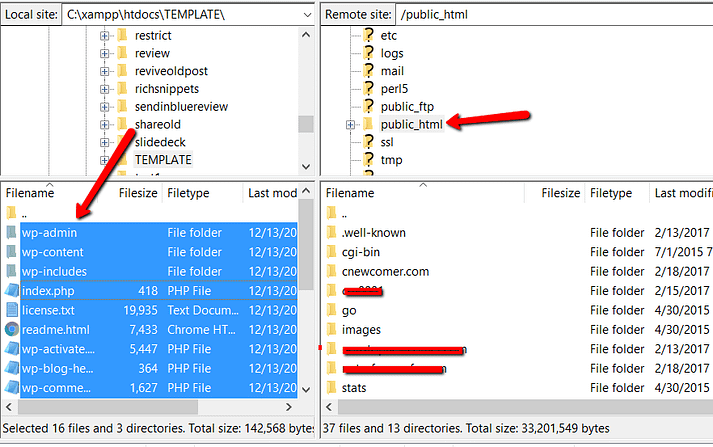
Then unzip the file and upload it to the public_html (or similar) directory of your website. If you’re not sure how to log in to FTP, ask your host for your FTP account information:
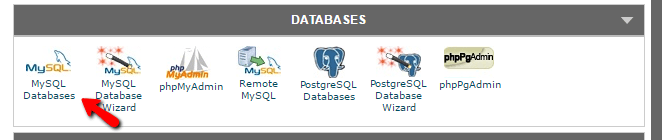
While that’s going on, head over to your cPanel account and find the MySQL Databases option:
You should see an option to Create a New Database. Enter a name for your database and click Create Database:

The name can be whatever you want – just make sure that you remember it. You’ll need it later on.
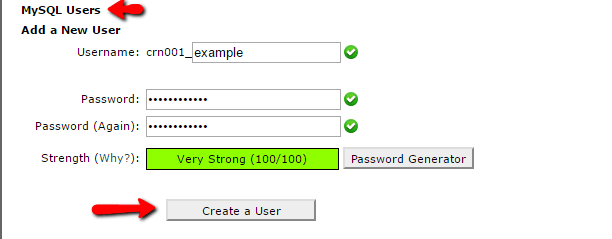
Next, you need to actually create a user for your database. So on that same page, scroll down to MySQL Users and create a new user:
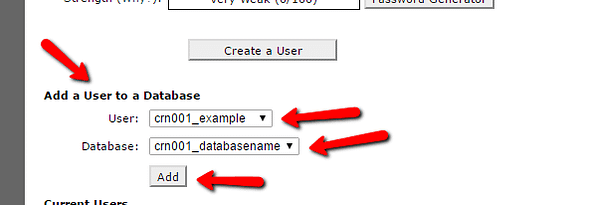
Once you’ve created the user, make sure to give it access to the database you created:
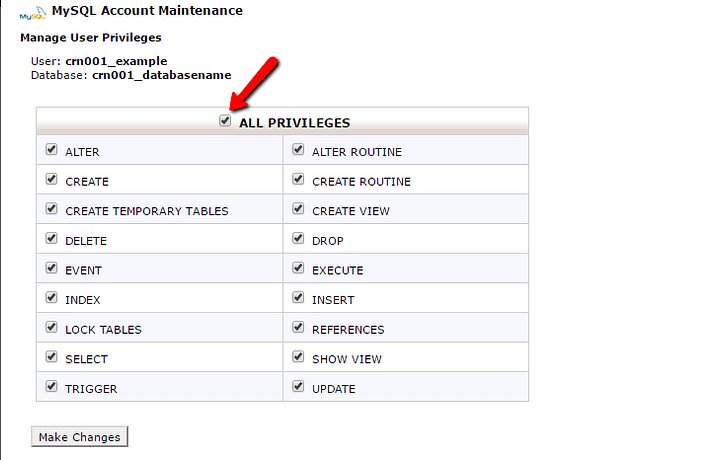
On the next page, also make sure to give that username All Privileges:
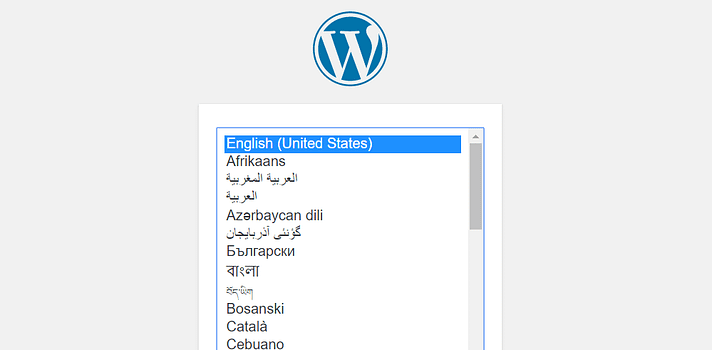
Now, assuming the FTP transfer has finished, you can go to your domain name to complete the installation process. When you visit your domain, you should see the WordPress install wizard. First, you need to choose your language:
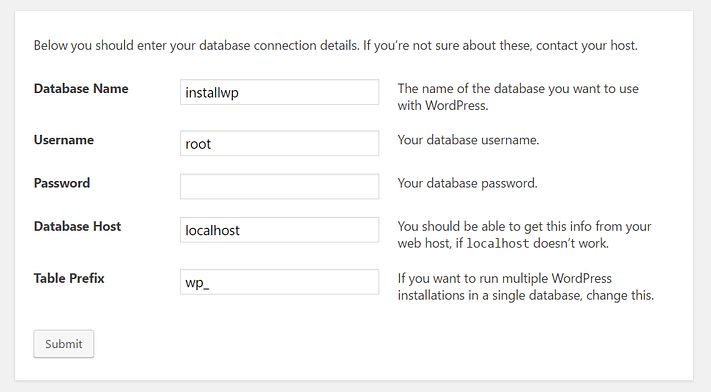
Then, make sure you have the details for your database name, user, and password handy. Enter them when prompted:
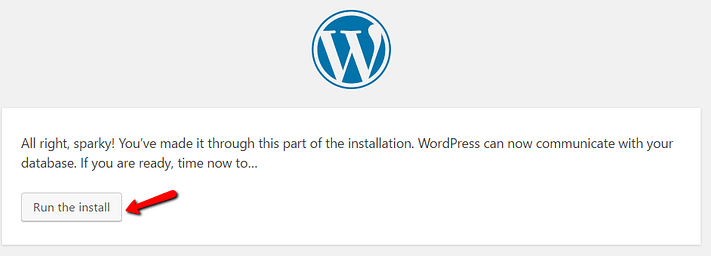
If all goes well, you should be able to run the WordPress install:
Give your WordPress site a title and enter the information necessary to create your admin account:
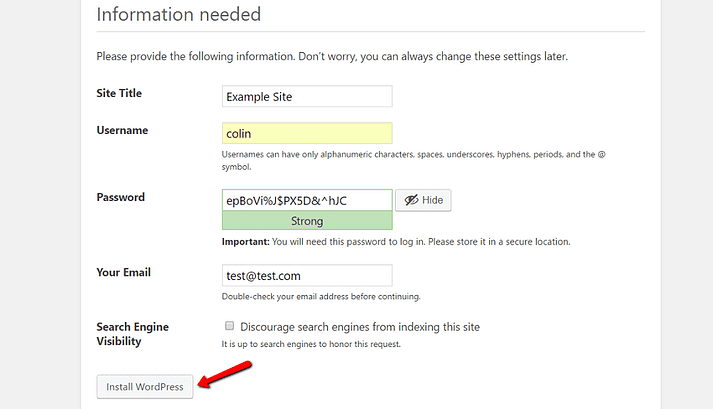
Then click Install WordPress.
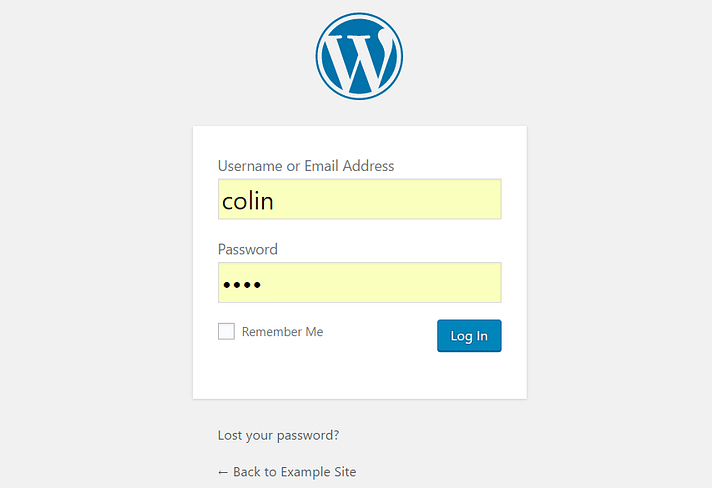
And that’s it! You just learned how to install WordPress manually. You can now log in with the account details that you entered during the install process:
Method #4: How to install WordPress on your own computer
If you want to create a sandbox where you can learn more about WordPress, you can install WordPress on your own computer. You’ll have a fully functioning WordPress install that you can play around with, it just won’t be accessible to anyone else.
That is, it will only be available on your own computer. This is also known as a “localhost”.
If you’re interested in such a setup, we wrote two posts on how to install everything:
Wrapping things up
Again, if you’re a beginner, just use the autoinstaller that your host (hopefully) provides. It’s easy, fast, and no different than installing WordPress yourself. Or better yet, choose a host that comes with WordPress pre-installed.
If you want to learn how to install WordPress manually just for the pride of it, then go ahead and try. But I promise you that after you’ve installed WordPress manually for the hundredth time, you’ll become a big fan of autoinstallers!
As always, don’t hesitate to ask if you’re having any trouble installing WordPress. We’re happy to help.
Article by Themeisle.com